Showing posts with label Flexfields. Show all posts

Tuesday, 25 June 2013

Fusion Apps SaaS Service Scenarios

Hosting Service scenarios for Oracle Cloud Fusion Applications services

Oracle has documented different service scenarios which customer may ask for if they want to use SaaS. While creating service requests for cloud apps you will be presented with a list of services that Oracle will support.

Following are the services that are provided:
Email Notifications - Enable or disable email notifications

IP Address WhitelistAllow access to Oracle Fusion Cloud Services to a list or range of specific client IP addresses for their services from corporate network.

Language Pack installation - Ask for additional language pack.

Personalize Logo - Personalize Fusion Applications with your company logo.

Production to Test (P2T) copy - Copy the Production environment database into a Test environment on a one-off basis.

Enabling Flexfields for OTBI analysis - You can configure DFF and create analysis/dashboard based on that. To enable the DFF for OTBI analysis you can create service requests.

FA Admin Password reset  - Request to reset password provisioned with IT Security Manager Job Role, Configure SSO -  Configure Single Sign-On (SSO) access to Oracle Fusion Cloud Services based on Identity Federation.

Environment Resizing - By default, test environments are sized to support enough concurrent users for basic use of the environment. In order to assure that your use of the test environment will not be limited on a go-forward basis, you should request the pod resizing service option for your test environment(s) early on in your implementation. Production environments are sized to support the number of users you have purchased

All of these are well documented in MOS note Hosting Service scenarios for Oracle Cloud Fusion Applications services [ID 1529174.1]

Monday, 24 June 2013

Fusion Apps - Synchronizing Customized Flexfields in the MDS Repository for SOA

In my previous post I explained  How to Configure Extensible Flexfield When you customize and deploy Oracle Fusion Applications flexfields a new XSD file is generated in the MDS repository for Oracle Fusion Applications. SOA composite applications in Oracle Fusion Applications reference copies of the original XSD schema files included in the MDS repository for SOA. So the updated XSD files must be synchronized in the MDS repository for SOA for use in the fact models in business rules. 
To perform this synchronization, a special SOA composite application named UpdateSOAMDS is included with Oracle Fusion Applications. By default, UpdateSOAMDS is automatically deployed. When a synchronization is required, you manually invoke an instance of this SOA composite application to synchronize the updated XSD files in the MDS repository for SOA. You can view the results of this synchronization in the audit trail in Oracle Enterprise Manager Fusion Applications Control.

Let's see how to do that. In this example I had modified Location Information EFF in Fusion HCM Workforce Structure. So I should log  into HCM Domain and run the UpdateSOAMDS  from there.
Click on the UpdateSOAMDS composite. On the right hand side click on Test button. Once you click on Test, you will see a screen like the next picture.


Select Operation - updateDuring  and payload as P1D. It means last 1 day. If you want to run it for last 1 Month and 15 days and  3 Hour then it should be P1M15DT3H. After entering the values click on Test Web Service.
You can trace the result.


Click on Instances
Click on the latest instance id which has been submitted by you. It will open a new screen which looks like the next picture.


Click on the composite to trace.


As marked in the picture, after running the composite the system has synchronized the XSD schema of the modified Location Information EFF extensible flexfield to SOA metadata repository.


This will make the new context sensitive segments to be available for use in SOA.

Cheers...........................


Sunday, 16 June 2013

Fusion Apps New Flexfield -Extensible Flexfields

An Extensible Flexfield (EFF) is similar to a descriptive flexfield(DFF), but with the added ability for customers to add as many context-sensitive segments to a flexfield as they need.
Another feature of extensible flexfields is that you can have more than one context associated with any particular row of data, and a row can have multiple occurrences of the same context. That is, extensible flexfields support a one-to-many relationship between the entity and its extended attribute rows.


Now let's go through this process of configuring an EFF. In order to do that you need to first find whether EFF exists in a Page. Below are the steps to find that. We can not use Administration -> Highlight Flexfield to mark an EFF. Here we have to use Page Composer to do that.


I have taken example for Managing Locations in HCM.

So Navigate to Nagigator -> Workforce Management -> Workforce StructureSelect Manage Locations from Locations Task Pane and search a Location e.g. Sample Location EFF
This is what you will see. This Page has an EFF and that can be seen from the next figure


The area marked in RED is where EFF has been plugged in (as delivered by Oracle).
Now we need to know the details of this EFF. So open the page through page composer (Administration --> Customize Workforece Structure Pages). When prompted select Site as the layer. We are not going to modify anything in the page. We will just be checking the details of the EFF


This will open the page in Source view. If it has not then select View -> Source from the top left corner.

Select View-> Source Position -> Left from the top left corner. This will give you larger space to go through the source structure.


Now in the page, if you select the area where EFF exists then the corresponding node in the structure will be automatically highlighted. Check the region names (take the mouse pointer on the region and it will display the Task Flow name). Find names which has EFF in it as shown.

Once you click on that it will take you to another view. Next figure shows that.When Prompted for Edit confirmation accept that.


Now in the new view you will again see some regions. Check the region which has name EFFContextsPageContainerFrag.jsff. This is the region which display the EFF in the page.
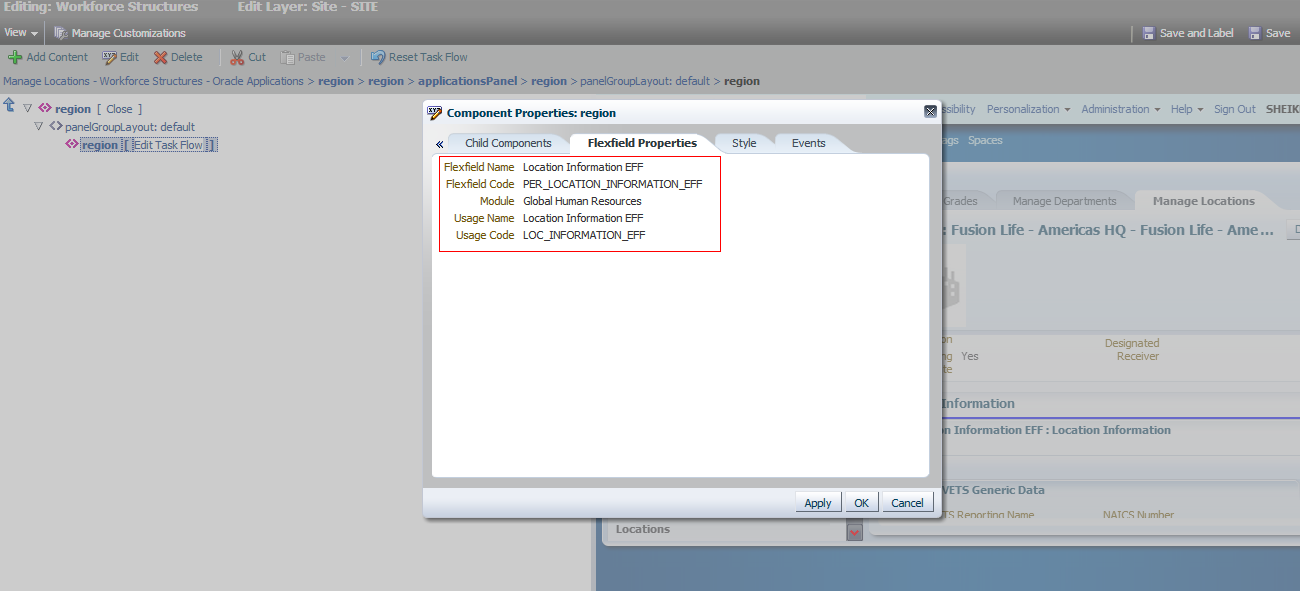
Click on Edit from the menu bar. That will open a Pop up as shown in the next picture.


Click on Flexfield Properties.


This displays the EFF Name and code. Here the EFF name is Location Information EFF. Copy the name and code and close this pop up by clicking Cancel button.
Then click on Close located at the top right corner.


Now at this point we have EFF name and code details. We will configure this EFF and add custom Contexts and context sensitive segments to it.

To configure the EFF we have to use FSM (Setup and Maintenance) task Manage Extensible Flexfields and search that.
Click on Go to Task and search the Location Information EFF.


Click on Action -> Edit.


In this screen you see EFF details along with a section named Category.
Extensible flexfields also enable implementers to combine the contexts into groups known as pages, which serve to connect the contexts so they will always be presented together in the application user interface. Hierarchical categories for can be defined for extensible flexfields, and implementers associate any combination of contexts with a given category. For example, the Electronics and Computers category hierarchy might include a Home Entertainment category, which in turn might include an Audio category and a TV category, and so on. The Home Entertainment product might have contexts that specify voltage, dimensions, inputs and outputs. Contexts are reusable within a given extensible flexfield. For example, the dimensions context could be assigned to any category that needs to include dimensional information.

As can bee seen from the above it has a Single category. Most Fusion Apps EFF are supplied with a single category. Some EFFs (e.g CRM Application) have Multiple categories and they have category hierarchy. As it has one, let's create a Context and associate it with the category. To create context click on Manage Context button


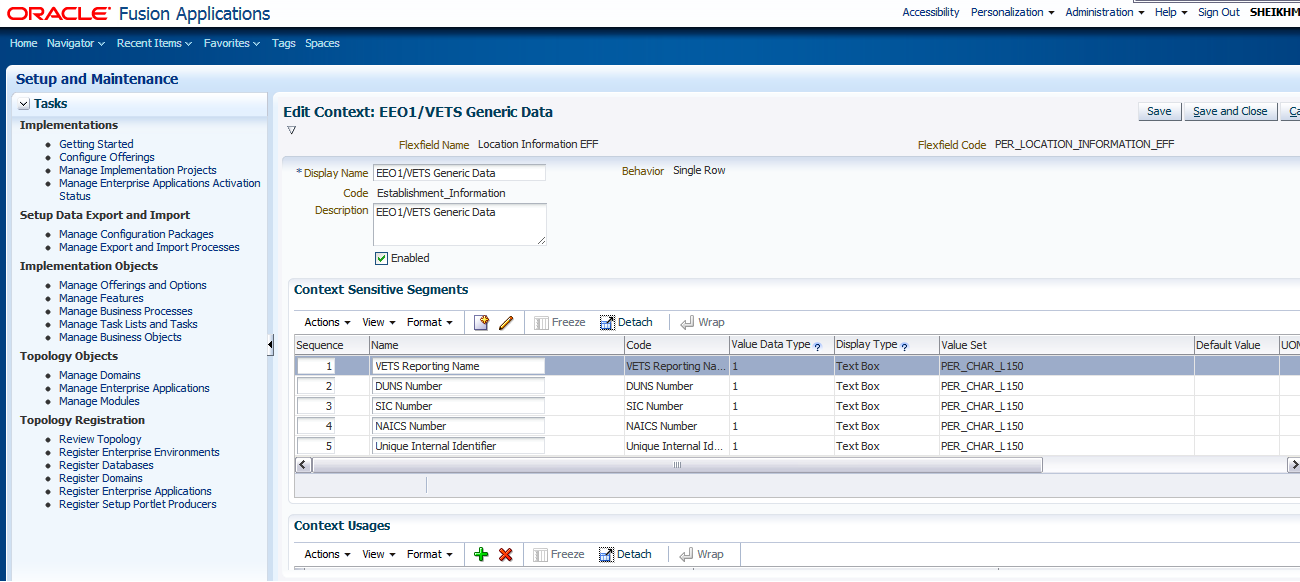
Select any existing context and then click Actions -> Edit  to see the details of the segments.


For our exercise we will create a custom Multi Row Context as shown in the next figure.


Give it a name and code. Specify Behavior is Multiple Rows. This will allow user to enter multiple rows into a Context inside a category.

Select Usage of the context as Location Information EFF. Basically a context may be reusable which means it can be used in multiple EFFs.


Select View Privilege and Edit Privilege. Then in the Context Sensitive Segments section select Actions --> Create to create segments in the given context


Enter all the Name, Code, Data Type, Table Column, Value Set, Required Display Prompt etc and then Click Save and Close.


You can click Detach the table to float the table and get extra display area.


Now for Multiple Rows Context if you do not specify an Unique Segment, then you try to save the values you will get this error. So go back and mark one segment as Unique.


You can set the Unique Segment as shown.

Now after creating all the segments and associating Table Columns and Value Sets with each of the them, you Save and Close the Context and then go back to the EFF screen. You now need to associate these custom Contexts with the EFF Category. So select HcmLocationsCategory in the Category Panel and then scroll down


Now select on Associated Contexts Tab and Click on Actions->Select and Add


This is what you will see. Search the contexts and click on Apply and Ok sequentially. In this case I have created a multi row and another as single row.


So you have now associated Custom Contexts with the Category. Click on Save. Now we want to club all the contexts and display them together. To do that we need to associate these two contexts with the existing Page which is displaying others. You can create a new Page by grouping your own custom contexts. But here we will put our contexts inside the existing Page. So click on Page Tab.
As you can see that it has one page and five contexts associated with that sequentially. You can change the sequence.

Select Actions --> Select and Add from Location Information: Associated Context Details. Search the Custom contexts and add them. You can also specify the sequences as shown.
Click on Save and Close.
From Actions select Validate Flexfield. This validate the Flexfield and displays errors if the EFF has any. You can deploy it to the instance itself by selecting Deploy Flexfield or you can deploy it to Sandbox. Sandbox is a container where you can put all your customization and then migrate the same to other instances. Also if you want to test the EFF before publishing it to the user community then you can do this by deploying it to Sandbox. 

Normally we create Sandbox first then we active it and do all customizations inside that. You create Sandboxes using Administration --> Manage Sandboxes and after creating it you can make it Active.


But here in case of EFF, if you select Deploy Flexfield to Sandbox


From the pop up box you can see that it is going to create a Sanbox, deploy the flexfield to it and then make it current active session sandbox. Click on Ok and then it displays the deployment details as shown in the next picture.


As can be seen that it has failed during deployment. Expand the Deployment Details to see the error. As it errored out I will not be able to show the EFF on the locations Page. 


I did check HCM Domain EM and found the error message that states oracle.jbo.NoDefException: JBO-25058 error. Then the MOS document Fusion PIM: Item Extensible Flexfields Deployment Ends In Error [ID 1536436.1] provided me the hint -'Attributes that were defined as Text Box and Text Area do not have height or width defined'. 

I checked my attributes and found that attributes were not having Height specified. After fixing that I redeployed the EFF and this time it was successful.
Let's go to Manage Locations task in FSM and search Sample Location EFF location. Below are the pictures which shows both Multi Row and Single Row Contexts
Multi Row Context


Single Row Context


This covers how to

  • Find Extensible Flexfield in a page ??
  • Configure the EFF through FSM ??
  • Deploy the EFF ??
  • Verify the results ??
Similarly you can follow the same process for Category Hierarchy having multiple categories.

Do let me know if you face any issue.

Cheers........

Thursday, 13 June 2013

Flexfield Migration in SaaS Environment

In my first post I discussed How to Find DFF and modify it as per the requirements. Now let's say you have defined the DFF in test environment and now you decided to migrate it to other instances. 

Oracle has documented Document 1510288.1 - Guidance for Managing Customizations in Oracle Cloud Application Services: Flexfield Migration the way to migrate DFF in cloud environment. 

Here are the few key points from that document

Special Considerations

  • To avoid synchronization issues, migrate flexfield customizations prior to migrating UI and BI customizations. 
  • Only flexfields with a deployment status of Deployed or Deployed to Sandbox are eligible to for migration.
  • The import process on the target environment automatically submits affected flexfields for redeployment.


Prerequisites

  • Ensure source and target OCAS environments (e.g. Test and Production) are at the same patch level.
  • Create an implementation project in the Setup and Maintenance (FSM) work area.
  • Configure all applicable flexfields in the source environment using the following tasks in the

Setup and Maintenance work area:

  • Manage Descriptive Flexfields
  • Manage Extensible Flexfields
  • Manage Key Flexfields
  • Manage Value Sets
Checking with Oracle whether it is possible to migrate without creating implementation Projects.

Keep checking for the update

Monday, 10 June 2013

How to Find and Edit Descriptive Flexfield (DFF) on a Page???

Like many others I am also from Oracle EBS background. While trying to find ways to extend existing application many of you will be wondering to see whether Flexfield has been incorporated into Fusion Applications. Flexfield is a way of capturing business data which has not been captured in the pages. In reality it is not possible to create an application to satisfy every possible data a particular Product in a particular business operates. This is why Oracle came up with idea of Flexfield. In EBS we have seen two flavors of Flexfield

  • Key Flexfield (KFF)
  • Descriptive Flexfield (DFF)
In Fusion Applications Oracle has introduced one more category and it is termed as Extensible Flexfiled (EFF)
Key Flexfield is something which has been introduced to capture the structure of business data like your Ledger Accounting, System Items, Jobs etc. You have to set up these in order to make the application work as designed. Descriptive Flexfield on the other hand has been introduced to capture additional business data which are required for the business but no standard UI region has been put in the pages. You may set them up as per gap analysis done by Functional Consultant. You need to see what has been provided by Oracle and what is your present as-is business. 

Now let's say you have found that some information are not captured in the page e.g Create Job Page and you want to enter additional information. So you need to create/configure DFF for that. To do that you need to first find out whether DFF is at all present in the page. There are two ways to do that use
  1. Highlight Flexfield
  2. Customize <Page name> under Administration Link as shown
Highlight Flexfield from Administration Link


Click on the Information button to see the DFF details


This picture shows DFF details from Page Composer. Click on Customize <Page Name> and if asked select the appropriate Level. Select the main body region and Confirm Edit confirmation message and then from the source view at the Left Side (View--> Source Position--> Left) search word flexfield. Then Click Edit from the Top

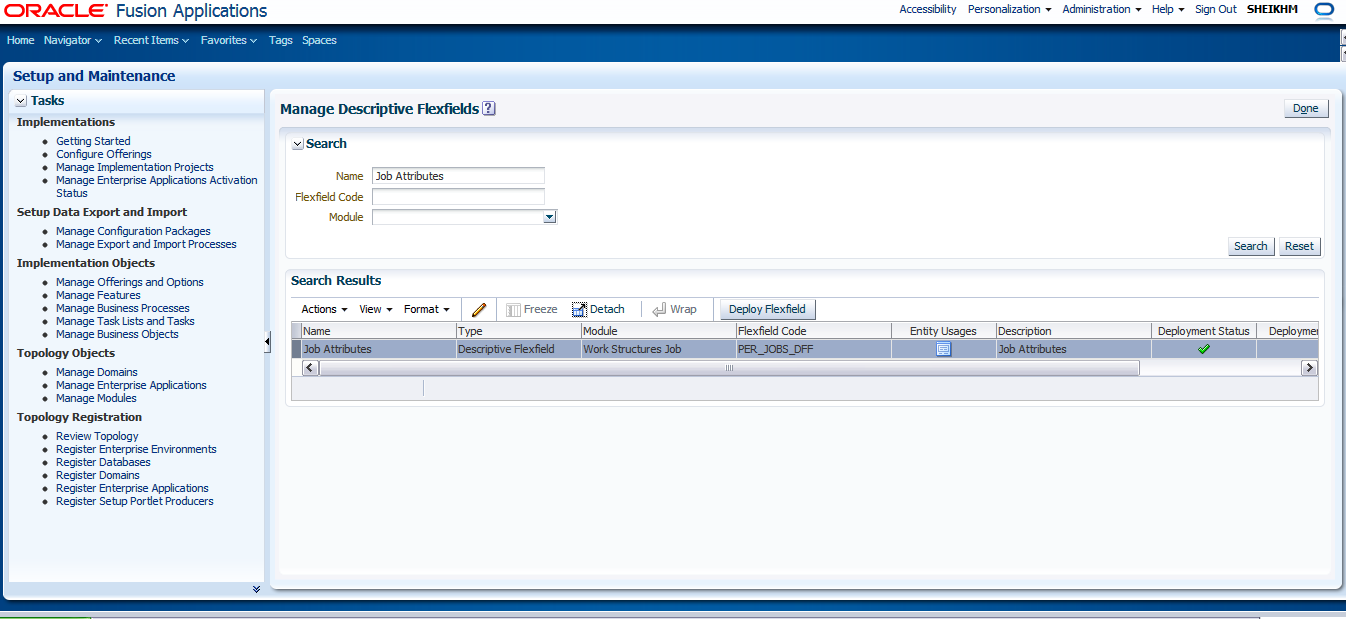
That will show the component properties for the Descriptive Flexfield as shown above. Now you have got the DFF name e.g. Job Attributes.

Now go to FSM and search Manage Descriptive Flexfields task and then click on Go to Task. Search Job Attributes Descriptive Flexfield


Click on Edit Link


Add Global and Context Sensitive Segments and then Save


Once everything is done, come back to Flexfield Screen and Click Deploy. This is same like Compile Flexfield in EBS. Once it is deployed successfully go back to Create Job Page and see that segments are now appearing.

This Completes finding and setting DFF in a Page. I will discuss in the following post 'How to Migrate Flexfields in Cloud Environment'..