Showing posts with label BI Reports. Show all posts

Wednesday, 14 August 2013

Fusion Apps - Can we update User Name using FBL??

I was doing some analysis whether we can use User Name Expression parameter of Manage HCM Configuration for Coexistence to create or update the user name with which user can log on to Fusion applications.

I have created a document with step by step instructions I followed to try this. You can find the document here.

Please share your thoughts and feedback. Try from your end and let me know if that works for you.

Keep checking this blog.

Sunday, 2 June 2013

Fusion Apps Custom BI Report Creation Part IV

This is the last post in this series of BIP Report Creation in Fusion Applications. In the last three posts I have shown how to create Data Model and Reports Definitions along with Bursting. You can find those here

  1. Fusion Apps Custom BI Report Creation Part III
  2. Fusion Apps Custom BI Report Creation Part II
  3. Fusion Apps Custom BI Report Creation Part I
Create an ESS Jos Job to run this report. Login to Fusion Home. From Navigator choose “Setup and Maintenance”. You must have proper Role assigned in order to access this.
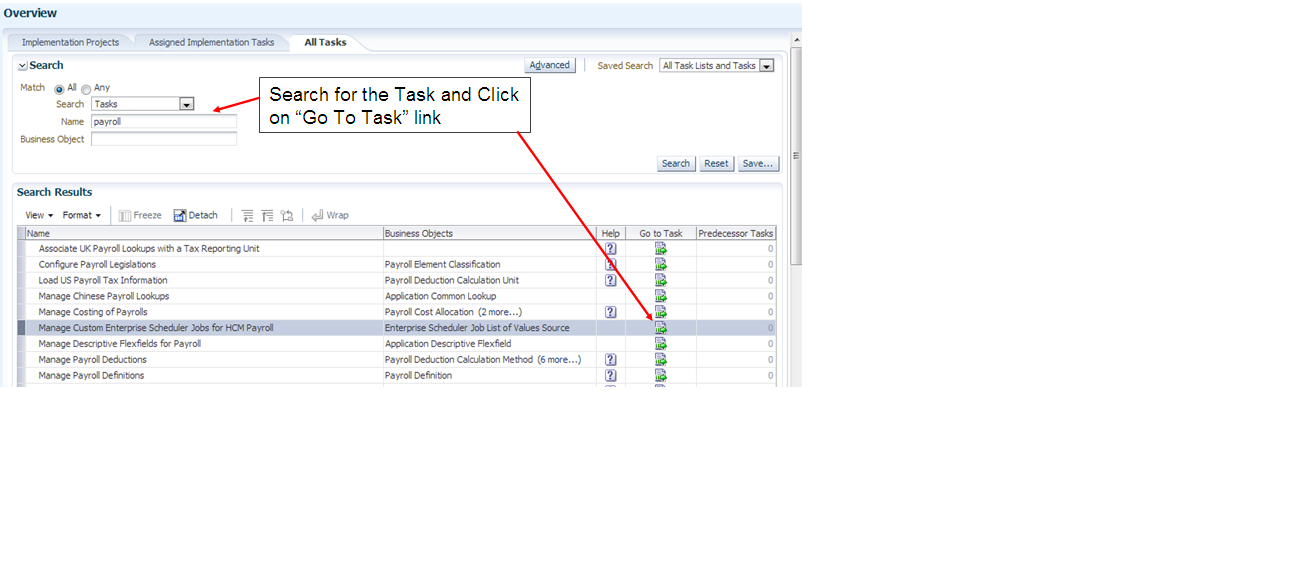
For my example I will use “Manage Custom Enterprise Scheduler Job for HCM and Payroll” Task to create our Job. In the FSM screen search this task
Click on Go To Task.


Click on Create Link to create a new Job.


Specify the Details as mentioned below

Click on “Show More” button to make all options available
Job Type must be of type ‘BIPJobType’
Check “Bursting Report” Check box
Report id is the absolute path of the report starting after “/shared/”. For our example we have entered “Human Capital Management/Payroll/DemoReport.xdo” in this field as full path of the report is “/shared/Human Capital Management/Payroll/DemoReport.xdo”
Check “Enable submission from Scheduled Processes” check box
Navigate to ‘User Properties’, add property ‘EXT_PortletContainerWebModule’ with value ‘Report’.
Define parameters in the “Parameter Tab”. As this report do not have any parameter we skipped this step.

Once the Job is Created, from Navigator choose “Scheduled Process”. 


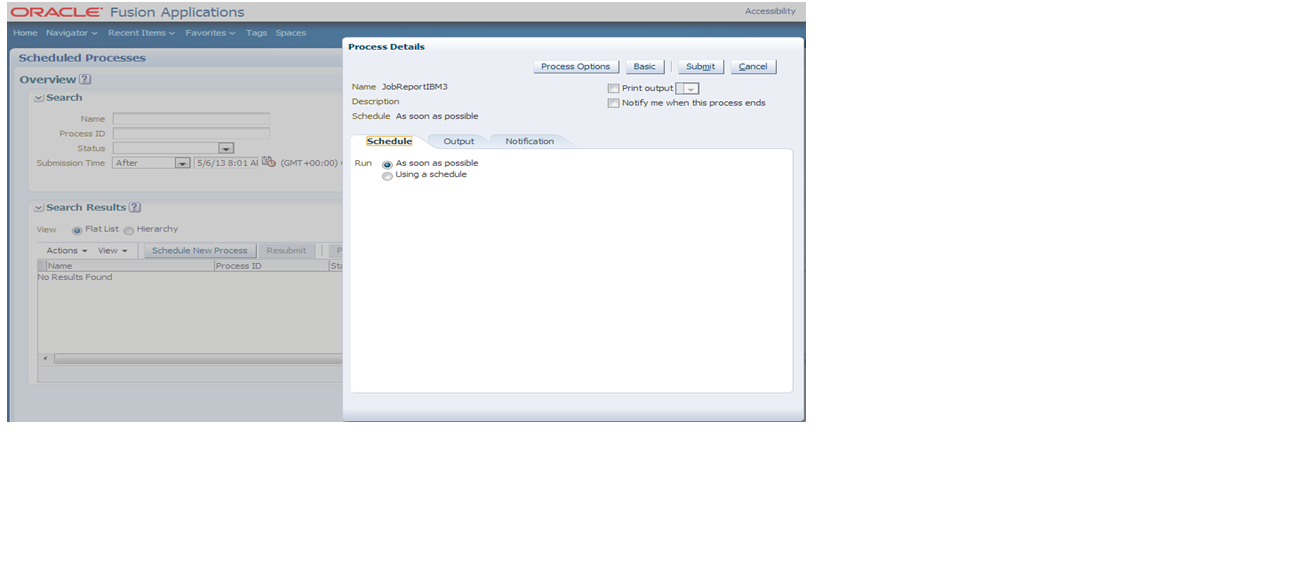
After clicking the Scheduled Process this screen will appear. Click on Schedule New Process Button. Search your Job name from the List & Click OK


Click on Submit. On successful submission system will confirm.This will  submit a Job and system will give a Process ID.


Wait for the Process to Complete. This is almost same like Concurrent Requests in Ebusiness. Once the requests successfully completed you can see the output


As you can see a single request has created multiple reports. If  you click on any one you will see the delivery confirmation that the email has been sent. Open your mail box if you had specified your id in the Bursting definition.


For me I got the email with output attached.


Cheers.......

Saturday, 1 June 2013

Fusion Apps Custom BI Report Creation Part III

Till now I have completed how to create the data model of your report. I have covered that in the last two posts


  1. Fusion Apps Custom BI Report Creation Part I
  2. Fusion Apps Custom BI Report Creation part II
So now after completing the above two you have XML data file which you saved in your local machine. The next step is to Create Custom Reports.


Create a custom report when the reports delivered with your Oracle Fusion application do not provide the data you need; or, if you want to use a predefined data model and change other properties of the report.
Here we go

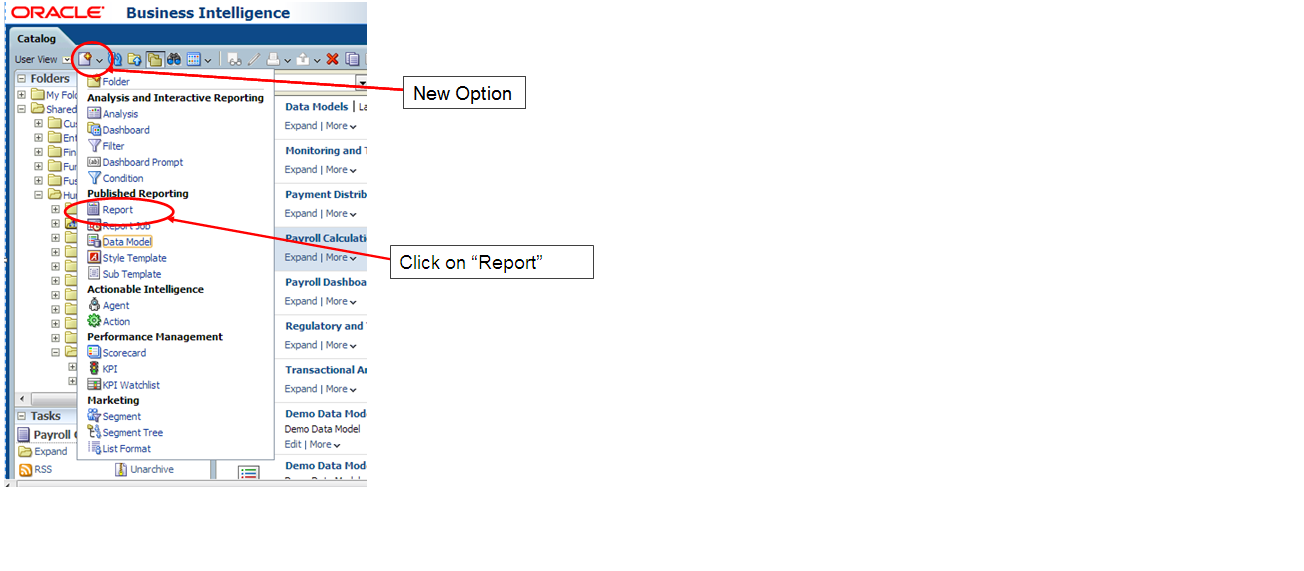
Click on the New Option and Choose “Report” and in the following screen do select the data model


As you have already created the data model, select Use existing data model


Browse through catalog and select the data model you have already created.


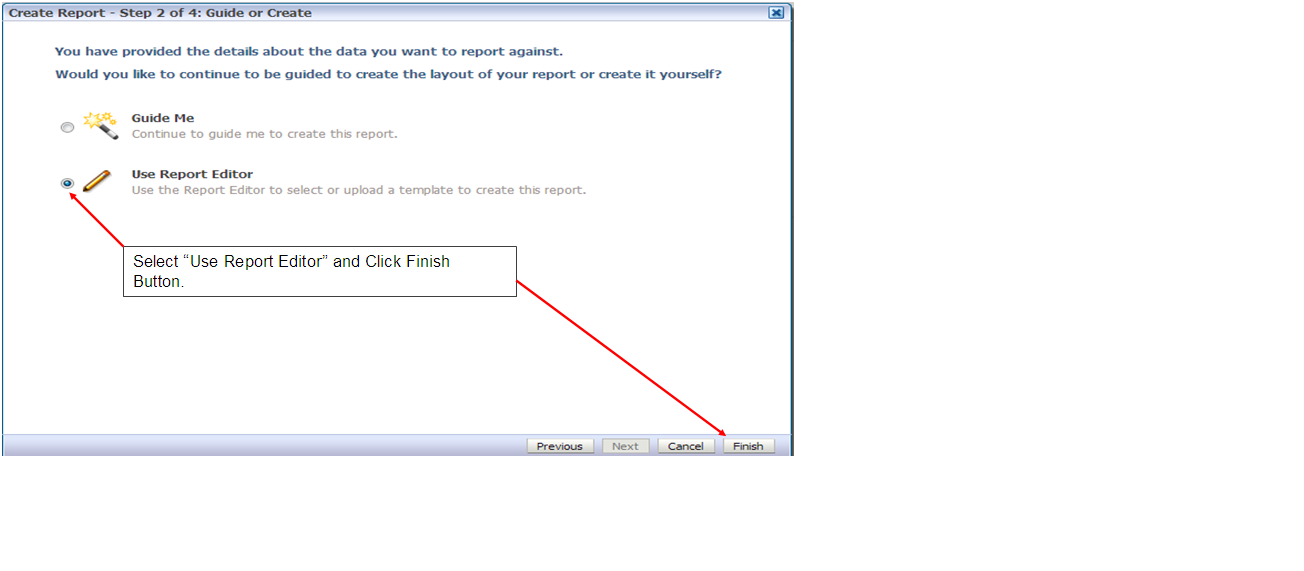
Select Use Report Editor to build your own report layout and click finish.


Specify the report name. This is the name by which it will be called from ESS if you want to run it from there.


Once done, click on upload the report template. In this example I have create a simple RTF template using MS Word with add on for XML Publisher.


Now if you want to add parameters create them in this step. Some parameters may be derived and some may be provided by users. So while creating parameters Check Show for those which you want users to enter.


Now specify the report properties. Those who are from EBS background may recall that this is almost same like Concurrent Program Creation Screen. Here you specify different controls about of the report.


Click on view report button to get the sample output.


Bursting is a process of splitting data into blocks, generating documents for each block,and delivering the documents to one or more destinations. The data for the report is generated by executing a query once and then splitting the data based on a "Key" value. For each block of the data, a separate document is generated and delivered. Using BI Publisher's bursting feature you can split a single report based on an element in the data model and deliver the report based on a second element in the data model. Driven by the delivery element, you can apply a different template, output format, delivery method, and locale to each split segment of your report. Example implementations include:

  • Invoice generation and delivery based on customer-specific layouts and delivery preference
  • Financial reporting to generate a master report of all cost centers, splitting out individual cost center reports to the appropriate manager

People who are from eBusiness Background may recall that we used to do this by writing a Burst Control File and attach it with the Data Definitions in XML Publisher Administrator Responsibility.
The burst control file looks like


What is the Bursting Definition?
A bursting definition is a component of the data model. After you have defined the data sets for the data model, you can set up one or more bursting definitions. When you set up a bursting definition, you define the following:
• The Split By element is an element from the data that will govern how the data is split. For example, to split a batch of invoices by each invoice, you may use an element called CUSTOMER_ID. The data set must be sorted or grouped by this element.
• The Deliver By element is the element from the data that will govern how formatting and delivery options are applied. In the invoice example, it is likely that
each invoice will have delivery criteria determined by customer, therefore the Deliver By element may also be CUSTOMER_ID.
• The Delivery Query is a SQL query that you define for BI Publisher to construct the delivery XML data file. The query must return the formatting and delivery details.

The bursting query is a SQL query that you define to provide BI Publisher with the required information to format and deliver the report. BI Publisher uses the results from the bursting query to create the delivery XML. The BI Publisher bursting engine uses the delivery XML as a mapping table for each Deliver By element. The structure of the delivery XML required by BI Publisher is as follows:


where
KEY is the Delivery key and must match the Deliver By element. The bursting
engine uses the key to link delivery criteria to a specific section of the burst data.
TEMPLATE - is the name of the Layout to apply. Note that the value is the Layout
name (for example, 'Customer Invoice'), not the template file name (for example,
invoice.rtf).
LOCALE - is the template locale, for example, 'en-US'.
OUTPUT_FORMAT - is the output format.
 Valid values are:

  • HTML
  • PDFZ - zipped PDF
  • PDF
  • RTF
  • EXCEL
  • EXCEL2000
  • MHTML
  • PPT
  • PPTX - PowerPoint 2007
  • XSLFO
  • XML
  • CSV
  • ETEXT


SAVE_OUTPUT - indicates whether to save the output documents to BI Publisher
history tables that the output can be viewed and downloaded from the Report Job
History page.
Valid values are 'true' (default) and 'false'. If this property is not set, the output will
be saved.
DEL_CHANNEL - is the delivery method. Valid values are:
  • EMAIL
  • FAX
  • FILE
  • FTP
  • PRINT
  • WEBDAV

OUTPUT_NAME - is the name that will be assigned to the output file in the report job history.

Delivery parameters by channel. The values required for the parameters depend on the delivery method chosen. The parameter values mappings for each method are shown in the following table. Not all delivery channels use all the parameters.

Delivery Channel                                PARAMETER Values
Email                                                  PARAMETER1: Email address
                                                          PARAMETER2: cc
                                                          PARAMETER3: From
                                                          PARAMETER4: Subject
                                                          PARAMETER5: Message body
                                                          PARAMETER6: Attachment value ('true' or 'false'). If your output               format is PDF, you must set this parameter to "true" to attach the PDF to the e-mail.
                                                          PARAMETER7: Reply-To
                                                          PARAMETER8: Bcc
                                                          (PARAMETER 9-10 are not used)


I have used only Email. All of the above values are set using the query dynamically. So if the Key element is having same value as specified by Deliver By 


SELECT department_id AS "KEY“  ---- As Department ID is our Deliver By element
      ,'DemoReport' AS TEMPLATE ---- Report Name
      ,'en-US' AS LOCALE  ---- Locale
      ,'PDF' AS OUTPUT_FORMAT ---- Output file will be in PDF format
      ,'EMAIL' AS DEL_CHANNEL ---- Sending bursting Output Via EMAIL
      ,‘to_mail_id@abc.com' AS PARAMETER1 ---- TO
      ,‘cc_mail_id@abc.com‘ AS PARAMETER2 ---- CC
      ,' from_mail_id@abc.com ' AS PARAMETER3 ---- FROM
      ,'You Have got a Mail' AS PARAMETER4 ---- Subject
      ,'Hey!! Bursting Successfull!!' AS PARAMETER5 ---- Body
      ,'true' AS PARAMETER6 ---- We want to attach PDF output in mail
      ,' reply_to_mail_id@abc.com ' AS PARAMETER7 ---- REPLY TO
FROM   xxfusion.departments

Select Report Properties and enable the bursting and select bursting definition.


This completes report creation and associating bursting definition with it. In the next series of this topic I will cover how to create Enterprise Scheduler Services Job to run this report and schedule it.......


Cheers.....................

Wednesday, 29 May 2013

Fusion Apps Custom BI Report Creation Part II

Let me recall what I did in Part I. I gave details about how to create


  • Data Model Data Sets
  • Links between Data Models
  • Aggregate Functions
  • Parameters 
Here is the link which has the details Fusion Apps Custom BI Report Creation Part I

So let's start the report template generation using  XML data file.
To do that follow the steps mentioned below
Generate XML


Specify the Parameter and number of rows of data you want in your XML. To make generated XML light you specify the number of rows.


Now after that save the XML to your local machine. 

Now before going to next step, let's make the parameters dependent with the previous one. Those who are from EBS background make recall that this is done in concurrent program parameters by prefixing $FLEX$.


The same can be done here. Let's say we want to Create Employee First Name parameter such that, once Department is selected then only employees belong to that department will be listed. We will define LOVs as 
After creating the Dept LOV create a second Employee First Name LOV which refers the Dept LOV as shown. This binds the second LOV with the first one. Now we need to tell system that whenever user will select Dept, refresh the Employee LOV. This is done by PPR(Partial Page Rendering) in ADF. 


Here it is specified as shown in the picture. After doing this if you go to Get XML then it will like like 


Change the Dept and you will see the employee list is changing.


Now that we have developed the basic skeleton, let's make it little bit more user input data sensitive. E.g if you want your query WHERE clause to change based on input parameters then you can do it by creating report triggers. Those who are familiar with Reports6i they know that same can be done using report triggers

  • Before Parameter Form
  • After Parameter Form
  • Before Report
  • Between Pages
  • After Report
Here in BIP, first we will create a parameter p_where_clause to append condition dynamically 

You can call it as Lexical Parameter. Now we will create a before_data Trigger. For that we need to create a DB Package first. All the parameters defined in the report must be defined In the package specification as global variable.


The logic we are going to implement is that
If Department ID is passed then All the Employees of the Department will be listed
Otherwise if any part of employee name is passed in the parameter First Name then those employees will be listed
If Department ID and First Name both are NULL then no Condition will be applied.

We build this logic inside function before_data of xx_demo_report_pkg package.

Any function used in Data trigger must have return type as BOOLEAN. 

Below is the sample package code you will create in FUSION schema.

CREATE OR REPLACE PACKAGE xx_demo_report_pkg

IS

   p_dept_id        NUMBER;
   p_first_name     VARCHAR2 (100);
   p_where_clause   VARCHAR2 (1000);

   FUNCTION before_data
      RETURN BOOLEAN;
END xx_demo_report_pkg;


CREATE OR REPLACE PACKAGE BODY xx_demo_report_pkg
IS
   FUNCTION before_data
      RETURN BOOLEAN
   AS
   BEGIN
      IF (p_dept_id IS NOT NULL)
      THEN
         p_where_clause   := ' AND emp.department_id = :p_dept_id ';
      ELSIF p_first_name IS NOT NULL
      THEN
         p_where_clause   := ' AND upper(emp.first_name) like ''%'||UPPER(p_first_name)||'%'' ';
      ELSE
    p_where_clause := NULL;
 END IF;
      RETURN TRUE;
   EXCEPTION
      WHEN OTHERS
      THEN
         RETURN FALSE;
   END;
END xx_demo_report_pkg;

After creating the package do the following


Choose the function and click the shuttle arrow. Now go ahead and change the WHERE clause


Specify a space and click Ok.


This completes the Data Model part. In the next post will cover Report Creation..It's 12'O Clock in the night....Time to sleep....


Tuesday, 28 May 2013

Fusion Apps Custom BI Report Creation Part I


Introduction Custom Report Creation
§Roles Required
§Report Components i.e. Data Model and Report
§Components of Data Model
§Data Sets
§Parameters
§List of Values
§Report Triggers
§Layout Creation
§Bursting
§Creating ESS Job


At the end of this blog you will know.....
§How to Create a Custom Report?
§How to submit a Custom Report?
§How to use Bursting?

Roles Required to Create Custom Report

§BI Author
§BI Developer
§BI Consumer
§BI Administrator (If any setup need to be done)
Please go through this How to assign BIAdministrator Role to assign the roles.

Report Components

There are two main components of Report:
§Data Model – Where you create your query,  List of Values, Parameters, Event Triggers, Bursting Definition
§Report – A Data Model is attached with the Report. One or more Report Layout (RTF,PDF etc.) can be attached with a report. 

Data Model

Different Components of Data Model are:
§Data Sets – Where you create your query
§Event Triggers –You create your After Report / Before Report triggers here
§Flexfields –If any KFF is used in the report then here you can define
§List of Values –Create LOVs here
§Parameters – Define your parameters here
§Bursting – Define your Busting definition here


Logging in to BI Publisher


Navigation : Login >> Click on Navigator >> Reports and Analytics (Under Tool)
Alternatively : Open Direct Link http://<BIserver address>:<port>/analytics/saw.dll?bieehome


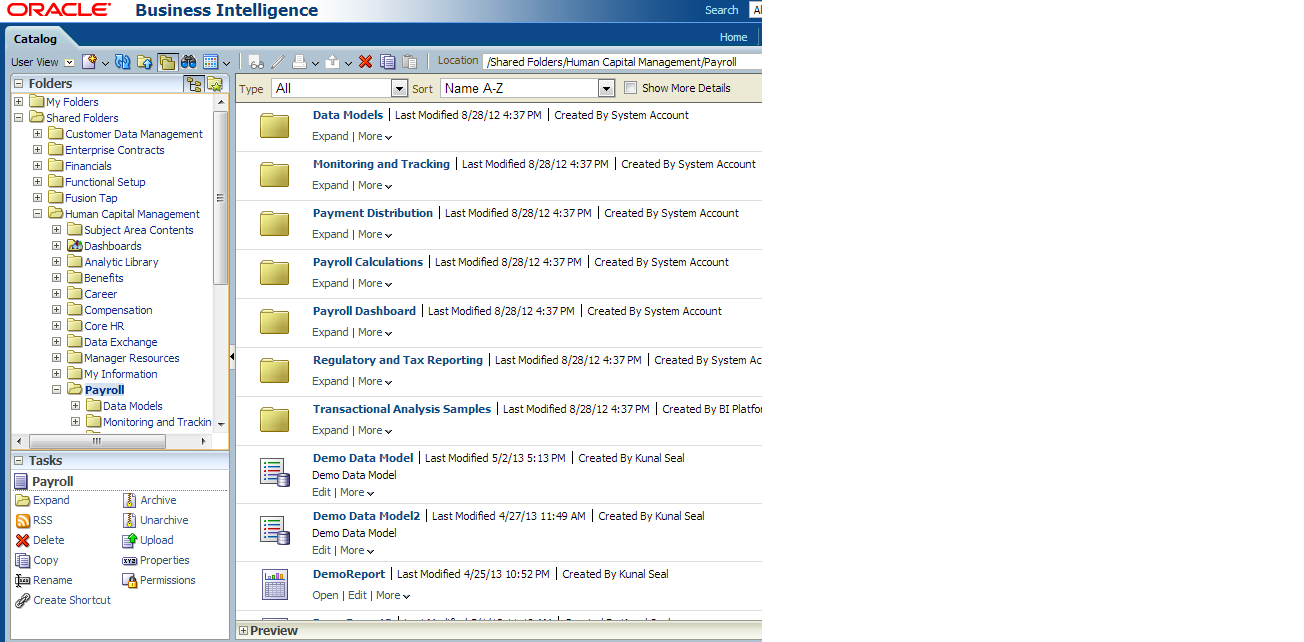
 Navigate to the Folder where you want to create your custom Report


Click on the New Option and Choose “Data Model”


Data Model Properties


Creating Data Sets


Creating Data Sets with SQL Query

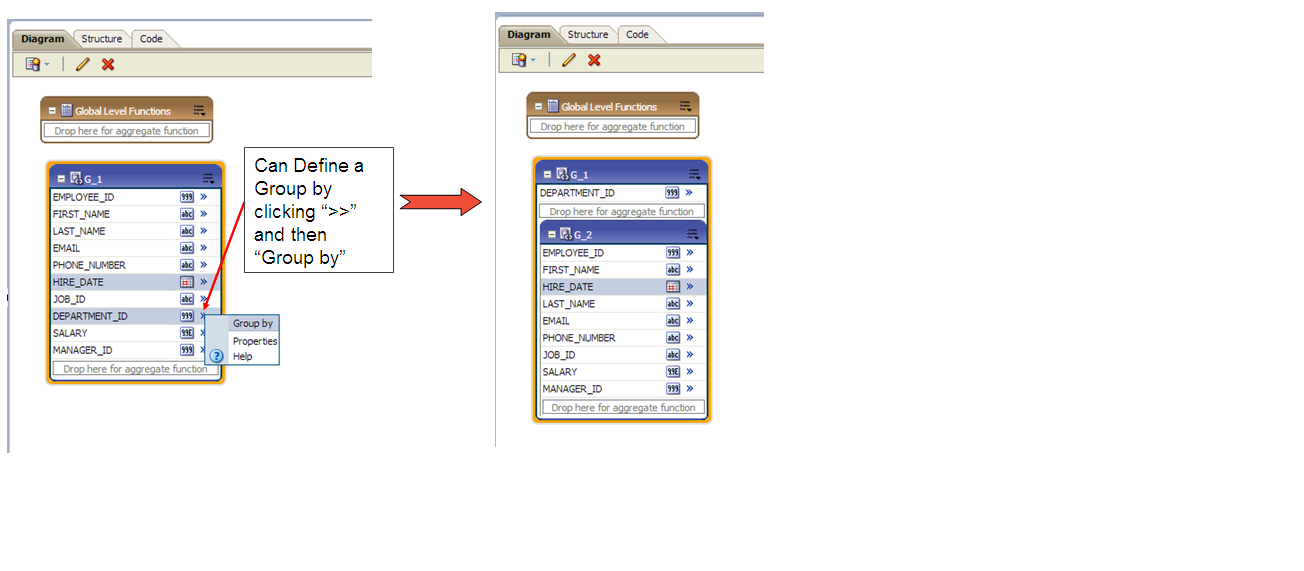
Defining Group By

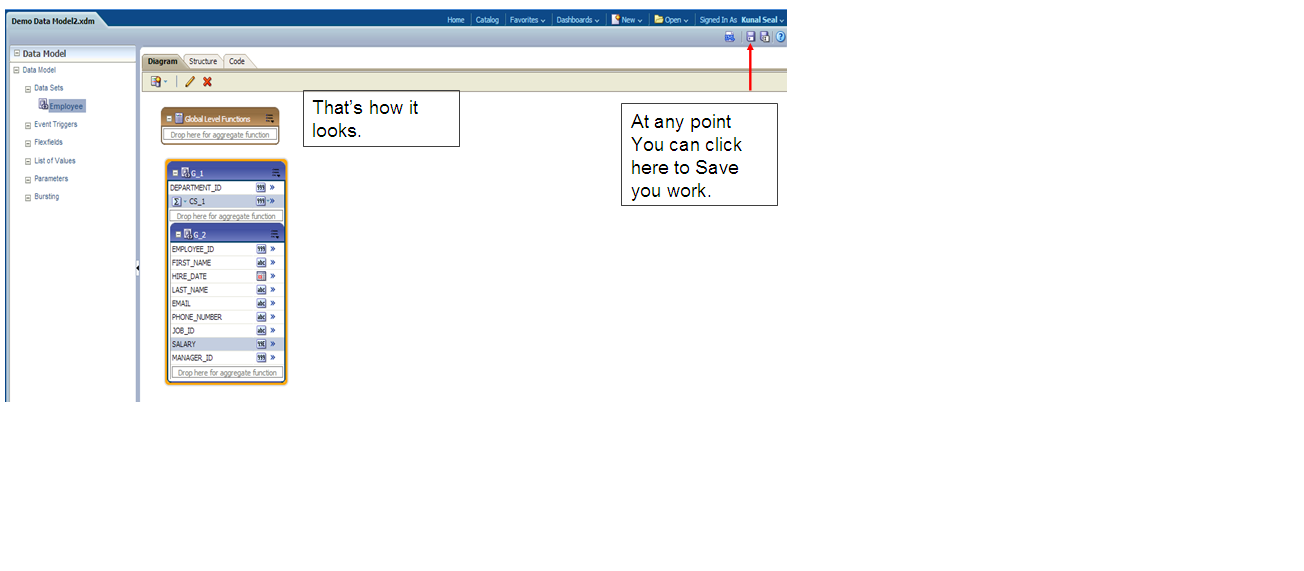
Creating Aggregate Function

Creating Aggregate Function

Creating Link Between Data Models

Creating Link Between Data Models


Creating LOV


Creating Parameters
Creating Parameters


Change Query to use Parameter Value


Will publish the remaining parts in the following posts......
Cheers..............................